



13 Jul Micro Burr Removal from Precision Parts
Micro burr removal is one of the most demanding deburring challenges in precision manufacturing. Unlike large casting flash or heavy stamping burrs, micro burrs are thin, small, and often intermittent formations left on edges and surfaces after CNC milling, turning, grinding, EDM, or laser cutting. They are difficult to detect visually at production speed, yet they can cause dimensional rejection, assembly interference, fatigue crack initiation, or contamination in critical components. This article explains the full process walkthrough for removing micro burrs from precision metal parts, covering where the process starts, how to select the right machine and consumables, which parameters control the result, and how to validate the outcome before production release.
In This Article
What Are Micro Burrs and Why They Require a Dedicated Process
Micro burrs are small material projections formed at the intersection of a machined surface and a cutting edge. Their height typically ranges from a few micrometers to several hundred micrometers depending on the cutting tool condition, material, feed rate, and cutting geometry. They are common on CNC-turned steel shafts, milled aluminum housings, ground stainless steel components, and EDM-cut precision parts.
Standard deburring methods designed for heavy burrs, such as manual filing, brushing, or aggressive vibratory cycles with coarse media, are not suitable for micro burr removal on precision parts. These methods carry the risk of dimensional damage, edge rounding beyond tolerance, surface scratching, or inconsistent results across large production batches. A controlled mass finishing process using the correct machine type, media geometry, media cut, and process chemistry is the preferred industrial approach when repeatability and surface quality are both required.
Process Start Point: Incoming Part Condition
Before selecting a micro burr removal process, the incoming part condition must be assessed. Key factors include the base material, part geometry, burr location, burr height, surface roughness requirement, dimensional tolerance, and whether any prior surface treatment or coating exists.
Parts arriving with cutting oil, coolant residue, or loose chips should be pre-cleaned before entering the finishing process. Contamination in the finishing machine can affect media performance, compound activity, and surface quality. In many CNC machining applications, a short ultrasonic cleaning or pressure washing step before mass finishing improves process consistency significantly.
The assessment must also confirm whether micro burr removal is the only objective, or whether edge rounding, surface refinement, or Ra improvement are also required. If multiple surface conditions must be addressed in one cycle, the process parameters and media selection must be adjusted accordingly. Combining deburring and surface finishing in a single cycle is often possible for precision parts, but requires careful setup and sample validation.
Machine Selection for Micro Burr Removal
Machine selection is the most consequential decision in the process. Three machine types are widely used for micro burr removal on precision parts, and each has a different working principle, intensity range, and suitability profile.
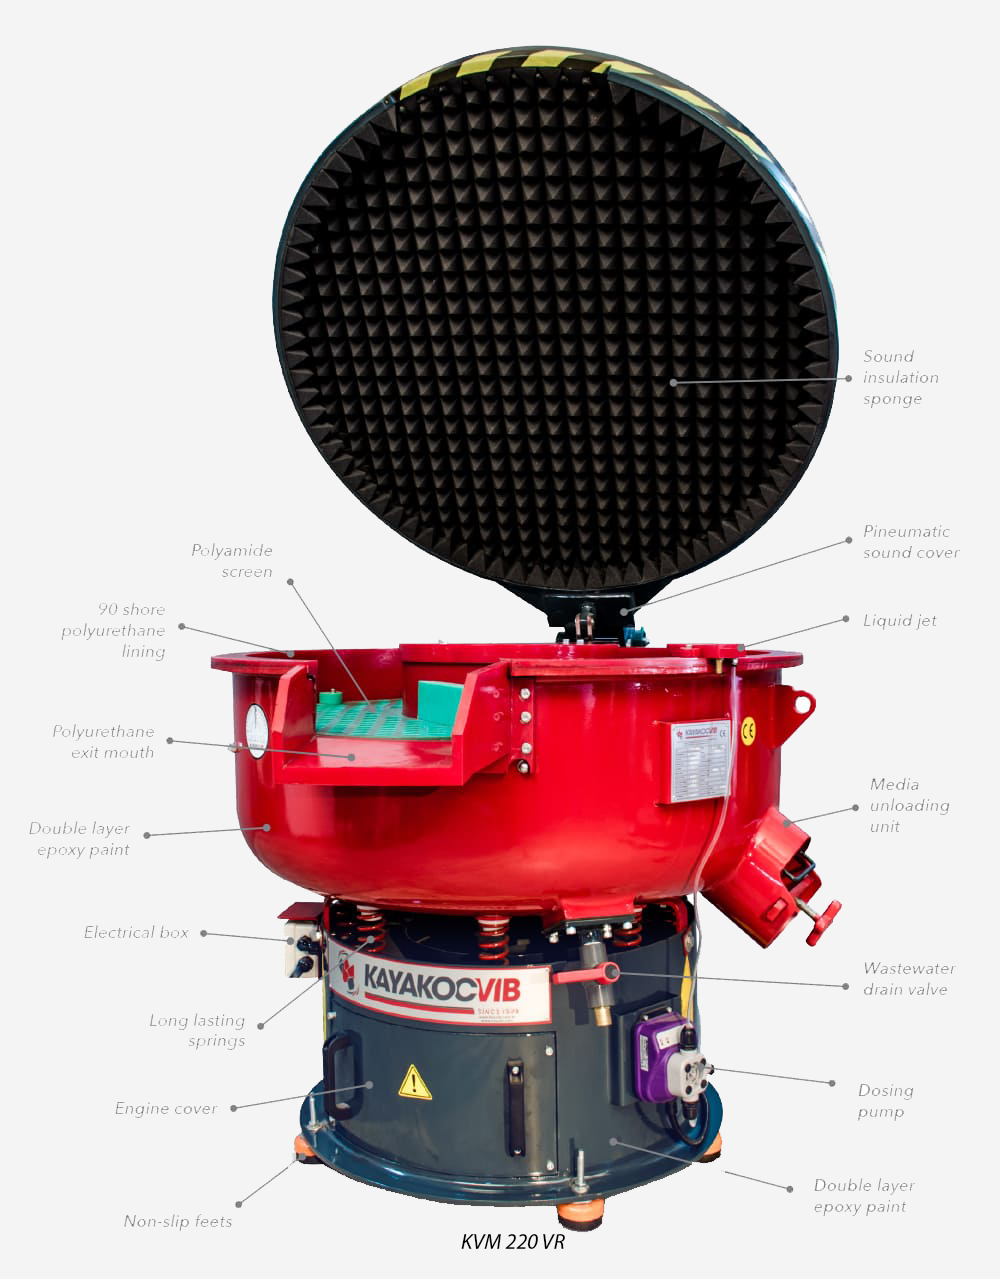
Circular vibratory finishing machines use a vibratory bowl with eccentric motor masses to generate a helical circulation of media and parts. The gentle tumbling action makes them suitable for a wide range of materials and geometries. A circular vibratory machine such as the KAYAKOCVIB KVM series is appropriate for mixed batches of small to medium CNC parts, fasteners, hydraulic components, and automotive precision parts where micro burr removal must be achieved without dimensional change or edge damage. Cycle times in circular vibratory machines for micro burr applications typically range from 30 minutes to several hours depending on burr size, media aggressiveness, and target surface quality.
Centrifugal disc finishing machines use a rotating disc at the base of a fixed tub to create high-intensity toroidal media circulation. The process intensity is significantly higher than circular vibratory finishing, which shortens cycle times substantially. The KAYAKOCVIB KSM series centrifugal disc machines are well suited for high-precision small parts such as medical components, aerospace fasteners, and hydraulic valve elements where micro burr removal must be completed quickly and with a fine surface finish. The higher energy also means that part-to-part and part-to-machine contact risks must be managed carefully through correct loading ratios and media selection.
Drag finishing machines move parts individually through a stationary media bed using a rotating arm and fixture system. Each part follows a controlled path through the media, eliminating part-to-part contact entirely. This makes drag finishing the preferred choice for fragile, high-value, or geometrically complex precision parts where micro burr removal must be achieved without any risk of impact damage. The KAYAKOCVIB DRG series drag finishing machines are used in cutting tool production, precision mold components, dental and surgical implants, and other applications where controlled, repeatable edge conditioning is required on individual parts.
| Machine Type | Process Intensity | Part Contact | Best For |
|---|---|---|---|
| Circular Vibratory (KVM) | Low to medium | Part-to-part tumbling | Mixed batches, CNC parts, fasteners, general precision parts |
| Centrifugal Disc (KSM) | Medium to high | Part-to-part in media | Small high-precision parts, short cycle times, medical and aerospace |
| Drag Finishing (DRG) | Controlled per part | No part-to-part contact | High-value individual parts, cutting tools, implants, molds |
Media Selection Logic for Precision Deburring
Media selection directly controls the cut rate, surface texture, and edge geometry produced during micro burr removal. The wrong media choice can leave burrs intact, generate unwanted edge rounding, or damage surface finish below the required Ra target.
For steel and stainless steel precision parts, ceramic media is the standard choice. Ceramic media provides the cutting action needed to break down micro burrs on harder materials. Fine-cut or medium-cut ceramic media in angular or triangular geometries works well for CNC milled and turned steel components. When a smoother final surface is also required, a two-stage process using cut ceramic followed by finishing ceramic or plastic media is common.
For aluminum precision parts, plastic media is generally preferred. Plastic media is softer and less aggressive, which protects the relatively soft aluminum surface from over-cutting or scratching. Aluminum housings, aerospace structural components, and anodizing-grade aluminum parts typically require plastic media to maintain dimensional integrity and surface quality during micro burr removal.
Media geometry must match the part geometry. Angular media reaches into concave features and internal corners better than cylindrical or spherical shapes. For parts with narrow slots, small holes, or complex internal profiles, media size must be selected carefully to avoid lodging. Media that is too small may enter holes and become trapped, causing production stoppages and part damage. As a general rule, media should be larger than the smallest hole or slot opening on the part.
Compound and Water Selection
Finishing compounds control the chemical environment inside the machine. They serve multiple functions simultaneously: they keep media clean and active, prevent part re-staining, adjust the cut rate of media, and protect the metal surface from oxidation or discoloration during the wet process.
For steel and stainless steel parts, a deburring and polishing liquid such as the 943 compound series is commonly used. This type of compound maintains active cutting conditions in the media bed and helps prevent staining on ferrous parts. A degreasing liquid such as 028-S may be added or used in a separate pre-cleaning stage to remove machining oils before the deburring cycle begins.
For aluminum parts, compound selection shifts toward products formulated for softer non-ferrous metals. The 085 compound series is a typical example used with plastic media on aluminum, providing controlled cut activity and surface protection. The 028-S degreasing liquid is also applicable for aluminum pre-cleaning when cutting oil or coolant residue is present.
Water flow rate must be maintained throughout the process. Insufficient water reduces compound activity, causes media to become glazed or loaded, and degrades surface quality. Most circular vibratory and centrifugal disc machines use a continuous compound and water flow drip system. The correct flow rate depends on machine size and bowl volume, and should be set during initial process development.
Step-by-Step Process Sequence
The following sequence describes a typical micro burr removal process route for precision CNC parts using wet mass finishing. Actual cycle times and parameters must be validated through sample testing before production release.
- Incoming part inspection: Confirm burr location, height, and part cleanliness. Identify any fragile features, threaded areas, or tight-tolerance surfaces that require protection or monitoring.
- Pre-cleaning if required: Remove cutting oil, coolant, and loose chips using pressure washing or ultrasonic cleaning. Dry or drain parts before loading into the finishing machine.
- Machine loading: Load parts and media into the machine at the correct volume ratio. A typical ratio for vibratory finishing is 1 part volume to 4 to 6 parts media volume by volume. Centrifugal disc machines require specific loading ratios per machine model and part geometry.
- Compound and water connection: Connect compound drip system and water supply. Set compound flow rate and water flow rate according to machine specifications and compound supplier recommendation.
- Process cycle: Run the deburring cycle at the target duration. For micro burr removal on precision parts, cycle times commonly range from 20 minutes in centrifugal disc machines to 60 to 180 minutes in circular vibratory machines. Drag finishing cycle time depends on programmed part path and media type.
- In-process check: At the midpoint of the first trial cycle, stop the machine and inspect sample parts for burr reduction, edge condition, and surface quality. Adjust cycle time, compound dosage, or media if required before continuing.
- Part-media separation: After the cycle, separate parts from media using a separator or separation screen. For wet processes, inspect parts for media lodging, especially in holes and slots.
- Rinsing: Rinse parts with clean water to remove compound residue. Stainless steel and aluminum parts may require a corrosion inhibitor rinse to prevent water marks or oxidation.
- Drying: Dry parts promptly after rinsing to prevent surface staining. Vibratory dryers or hot air drying systems are commonly used in production environments.
- Final inspection: Inspect parts for complete micro burr removal, surface finish quality, dimensional compliance, and edge condition. Record results and validate against specification before releasing to production.
Process Parameters That Control Micro Burr Removal Quality
Several process variables determine whether micro burr removal is complete, consistent, and within tolerance. Understanding which parameter controls which outcome allows engineers to adjust the process systematically rather than by trial and error.
Cycle time controls the total material removal and edge rounding produced. Longer cycles remove more material and create more edge rounding. For tight-tolerance parts, cycle time must be controlled precisely and validated through surface measurement and edge inspection.
Media cut determines how aggressively the media acts on the part surface. High-cut media removes burrs faster but also removes more base material and creates rougher intermediate surfaces. For micro burrs on precision parts, medium-cut or fine-cut media is usually the correct choice to balance deburring speed against surface quality.
Compound concentration and flow rate affect cut activity and surface brightness. Under-dosing compound causes media glazing and reduced cut rate. Over-dosing can cause excessive foaming in vibratory machines, which reduces media circulation efficiency.
Machine amplitude and frequency in vibratory machines control the energy applied to the media-part mass. Higher amplitude increases cutting intensity but may cause part damage for fragile components. Amplitude should be set to the minimum level that achieves consistent burr removal within an acceptable cycle time.
Washing, Separation, and Drying Considerations
Micro burr removal from precision parts is rarely the final step in the production sequence. The parts must exit the finishing process clean, dry, and ready for downstream operations such as inspection, coating, assembly, or packaging.
Part-media separation must be reliable. For small precision parts, the risk of media pieces or fragments being trapped inside bores, slots, or blind features must be assessed before production launch. A separation screen size analysis and a systematic inspection protocol should be part of the process validation.
Rinsing must remove all compound residue. Residue left on parts can interfere with coating adhesion, cause staining, or create contamination issues in clean assembly environments. For medical and aerospace precision parts, rinsing quality is a critical control point.
Drying should follow rinsing without delay. Wet steel parts will begin to oxidize within minutes if left without rust protection compound or drying. Vibratory drying systems using dry hardwood chips or ceramic drying chips are commonly used in conjunction with mass finishing lines for rapid and gentle part drying.
Validation Before Production Release
Before a micro burr removal process is released to full production, process capability must be confirmed through structured sample testing. This includes running multiple batches with the selected machine, media, compound, cycle time, and loading ratio, then inspecting the output against the part specification.
Key validation points include: complete burr removal confirmed by visual inspection or tactile measurement, edge condition within the specified rounding tolerance, surface roughness within the Ra specification, dimensional compliance on critical features, and absence of media lodging or part damage.
Any process change after validation, including a media supplier change, compound batch change, or machine parameter adjustment, should trigger a re-validation review. For regulated industries such as medical devices or aerospace, formal process validation documentation may be required as part of the quality system.
Frequently Asked Questions
What is the best machine for micro burr removal on small precision parts?
For small high-precision parts where short cycle times and fine surface finish are both required, centrifugal disc finishing machines are typically the most efficient choice. For parts where individual handling is required due to complexity or fragility, drag finishing provides the most controlled result. Circular vibratory machines are suitable for mixed batches and general precision deburring applications.
Can micro burrs be removed without affecting part dimensions?
In most cases, yes, provided the correct media, compound, cycle time, and machine intensity are selected. However, dimensional impact must be validated through sample testing. Very tight-tolerance features may require masking, selective fixturing, or a reduced cycle time with a finer media grade. Actual dimensional effects depend on material, burr height, and process conditions.
How do I know when the cycle is complete?
Cycle completion should be confirmed by part inspection, not by time alone. At the end of the target cycle duration, a sample of parts should be visually inspected and measured against the burr removal and surface finish specification. Develop a reference standard with accepted and rejected part examples to support consistent in-process inspection.
Is a separate washing step always necessary after vibratory finishing?
For most precision part applications, rinsing after wet vibratory finishing is necessary to remove compound residue. Whether a dedicated washing machine or a simple rinse station is required depends on part cleanliness specification, downstream process requirements, and part geometry. Parts with blind holes or complex internal features often benefit from ultrasonic rinsing to ensure complete residue removal from inaccessible areas.
Related Process Equipment
Related Video Demonstration
Conclusion
Effective micro burr removal from precision metal parts requires a structured process approach rather than a single machine or compound selection. The process begins with an accurate assessment of the incoming part condition, burr characteristics, and surface quality requirements. Machine selection must match part geometry, material, fragility, and production volume. Media and compound selection must align with the base material and target surface condition. Process parameters including cycle time, media cut, compound flow, and machine intensity must be set through sample testing and validated before production release. For CNC machining, automotive, aerospace, and medical manufacturing environments, a controlled mass finishing process using equipment such as circular vibratory, centrifugal disc, or drag finishing machines provides a repeatable and scalable solution for micro burr removal that manual or ad hoc methods cannot match consistently at production volume.
Sorry, the comment form is closed at this time.